
How to make a circle skirt
January 16, 2013
I have only posted a few tutorials on my blog and it has been ages since my last one. So here is one for a fun circle skirt.
I made one for Juliette and Isabella. The tutorial is for the skirt I made for Juliette (approx. 2 1/2 years).
You will need:
- Fabric - twice your child's length (of skirt - measure from waist to desired hem line) plus an additional 15cm and hem allowance (1cm). If you have very wide fabric, you may get the circle from just one length. I purchased 80 cm of 112cm wide fabric to make a 30cm length skirt;
- 1 inch wide elastic for waistband;
- Cotton;
- Pins;
- Tailor's chalk;
- String or wool (short length);
- Measuring tape;
- Scissors.
Note: Vertical patterned fabric doesn't work as well in a circular skirt. Avoid stripes:)
Method:
1. Begin by measuring your lucky circle skirt recipient.... waist circumference and length you would like skirt to be. A waist band will be added. Measurement should include hem allowance of 1cm or less.

3. Now for a bit of maths....Divide your waist measurement by four. Juliette measured approximately 53 cm around the waist so I got approx 13 cm (doesn't have to be to the millimetre). Cut this length of wool or string (ie. 13 cm). Place the piece of string around the folded corner to create an even arc. Trace around this with chalk.

4. Cut around the chalk line.

5. Keeping the fabric folded, measure the length you would like your skirt to be and mark this all the way around measuring from several progressive points around the cut arc. See chalk mark in bottom right of this pic.

See chalked line which will become skirt hem.

Remove baby and kitten from fabric(!) and cut around chalk line.

6. Unfold fabric and you will have a lovely neat circle with waist cut from centre. The waist is quite deceiving, because although it looks small as a circle. when pulled in shape of skirt, the waist appears much bigger (this is just an optical illusion!)

See what I mean? It is also partly due to the bias factor that arises from cutting a circle.

7. Fold your skirt waistline so that is sits in a straight line. Measure this, then double it and add 2cm.

8. Cut your waist band piece using above measurement for length and at a width of approximately 9cm. Sorry for blurry pic.

9. Fold this in half length ways with right sides together and sew (1 cm seam) to create a loop.


Hello Rosie! (Our new nine week old kitten). Very curious and affectionate!

10. Pin waistband and skirt waist at quarterly intervals (find quarters by folding and pinning at opposite ends and then repeating). See pic.

11. Match up pins and secure skirt and waist band together.

12. Sew the band and skirt together with a 1cm seam. I find it is best not to over pin for this part but rather to ease the sewing with your fingers and sew slowly.

13. Once sewn, your skirt will look like this. Iron your skirt at this point. Iron the waist seam up toward the top of the skirt so that it is hidden by the waist band when folded and sewn.

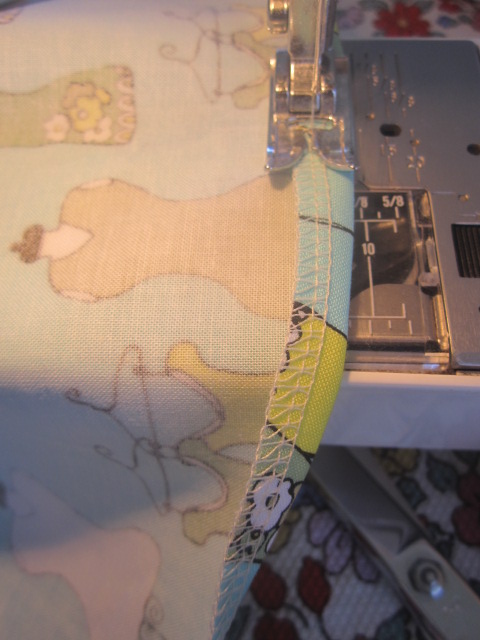
14. Overlock or zig zag top of waist band. Pin waist band down matching upper edge of band with seam joining band to skirt. I have shown this from the wrong side but I actually pinned it on the right side as I sewed it on right side to make sure it was neat.


15. Sew 1 mm in from seam, going slowly along pins. leave a 3cm opening in seam for elastic to be threaded through.

16. Top stitch along top of waist band - this will give a nice finished look and prevent twisting of elastic inside the casing.

17. Overlock and sew hem. A very small hem only as it is a circle and will pucker if you try to sew a large hem. Press hem.

19. Lay elastic as shown and sew several rows of straight stitch or zig zag. Ease elastic back into waist band and sew opening shut.

You have finished!!


I made Isabella a skirt too...

Isabella giving it some serious swirly action!

The girls will be wearing these outfits to my beautiful Dad's 65th birthday celebration in a fortnight. I have never seen Juliette so excited about an outfit as she is about this one for 'Nanpa's birthday'. I relented yesterday post 'photo shoot' and let the girls wear their new skirts and tops for the day just to save the tears! I have hidden them out of sight so they stay fresh and clean for the evening and the girls can do some proper swirly dancing!

Isabella's skirt is made from Denyse Schmidt Salty Aire daisy chain. Juliette's skirt is made from The Florist Mannequins in blue. Both were purchased from Spotlight - reduced to $8 per metre...love a bargain!
Linking up here today.
17 comments
Very cute skirts!
ReplyDeleteThanks for sharing the tutorial :-)
Enjoy your dad's party!
Lovely skirts! Great tutorial.
ReplyDeleteWhat a great tutorial! Those skirts look like so much fun! The girls are clearly enjoying their twirl-factor in those photos! :-)
ReplyDeleteCarly
x
Sweet skirts! I like the fabric waistband much better than the plain elastic ones. Thanks for sharing the tutorial.:)
ReplyDeleteGreat tutorial! I just made a circle skirt for my daughter (without your tutorial) and cut the fabric wrong so I needed 2 side seams. I love your explanation on how to fold the fabric. Next time I'll use your tutorial.
ReplyDeleteGorgeous suze, lovely models too!
ReplyDeleteGorgeous suze, lovely models too!
ReplyDeleteI found you through Mousehouse, thank you for sharing your tutorials, I also love your dolls house, job well done!
ReplyDeleteTwo beautiful skirts with the all important twirl factor. Thanks for sharing your comprehensive and easy to follow tutorial.
ReplyDeletethis was one of the best tutorials of a circle skirt that i have seen.. thank you for this tutorial!
ReplyDeleteI love the tutorial and am book marking it for my DGD. did you make the tank tops by chance? I am looking for a good pattern for tank tops/t shirts for little girls.
ReplyDeleteMichelle
Awesome tutorial! I may give this one a go.
ReplyDeleteThanks so much for the great tutorial!!! I looked through dozens to figure out how to cover the elastic on my daughter's skirt and this one finally made it work!!! Thanks again!
ReplyDeleteI've just finished my first circle skirt for my daughter with Your tutorial. That's fantastic, and first time I've found this kind of doing waist. Thank you! Without your tut I'll be still with just material.
ReplyDeleteHi. I'm having trouble with folding the fabric correctly - can someone help explain it to me?! This is my first 'real' sewing project, so please be kind :) I wanted a 35cm long skirt, so purchased 90cm of a 112cm wide fabric, based on the tips at the start of the instructions.
ReplyDeleteI've folded east-west to make one edge 51cm (35+15+1cm), but this doesn't leave enough fabric to make a 51cm edge north-south.
is it simply that I don't have enough fabric, or am. i doing something wrong. Any insight appreciated. TIA
nike air max, replica watches, michael kors outlet online, nike air max, christian louboutin uk, louis vuitton outlet, louis vuitton outlet, uggs outlet, nike free, longchamp outlet, burberry handbags, michael kors outlet, ugg boots, michael kors outlet online, oakley sunglasses wholesale, louis vuitton, tory burch outlet, burberry outlet, prada outlet, louis vuitton, prada handbags, longchamp outlet, christian louboutin, michael kors outlet, ray ban sunglasses, longchamp outlet, jordan shoes, polo ralph lauren outlet online, tiffany jewelry, oakley sunglasses, gucci handbags, uggs outlet, ray ban sunglasses, polo outlet, michael kors outlet store, oakley sunglasses, uggs on sale, christian louboutin outlet, replica watches, michael kors outlet online, ugg boots, tiffany and co, nike outlet, christian louboutin shoes, louis vuitton outlet
ReplyDeletepandora jewelry, doke gabbana, supra shoes, coach outlet, louis vuitton, toms shoes, pandora charms, ray ban, links of london, louboutin, louis vuitton, juicy couture outlet, ugg uk, lancel, wedding dresses, gucci, louis vuitton, ugg,uggs,uggs canada, oakley, ralph lauren, juicy couture outlet, montre pas cher, swarovski, michael kors outlet, ugg pas cher, nike air max, ugg,ugg australia,ugg italia, louis vuitton, louis vuitton, replica watches, hollister, converse, hollister, vans, marc jacobs, thomas sabo, ugg, michael kors outlet online, swarovski crystal, pandora uk, karen millen uk, converse outlet, michael kors handbags
ReplyDeleteThank you for taking the time to comment - it makes my day☼